
This page follows a three-file subset of the seven bundled Dubna pole figures from their files to a reconstructed orientation distribution function (ODF), then checks its fit. Florian Wobbe measured the quartz specimen at Dubna in 2005 using neutron diffraction, as recorded in the original MTEX Dubna example.
The example brings together the import, inspection, reconstruction, and validation steps developed earlier in this chapter. It assumes the pole-figure idea from Pole Figures, the import model from Import, and the inversion workflow from ODF Reconstruction. The origin of the ghost effect is explained in The Ghost Effect.
A plotting convention states how the specimen reference frame is drawn. This data set uses Y upward and X to the right. The convention does not rotate the specimen directions or change their intensities.
plottingConvention.default('y↑→x');Import the three measurements
Quartz is trigonal. The lattice parameters below define its crystal frame as well as the metric used to interpret the four-index notation introduced in Miller Indices.
CS = crystalSymmetry('-3m',[4.9 4.9 5.4]);

fname = {...
  fullfile(mtexDataPath,'PoleFigure','dubna','Q(10-10)_amp.cnv'),...
  fullfile(mtexDataPath,'PoleFigure','dubna','Q(10-11)(01-11)_amp.cnv'),...
  fullfile(mtexDataPath,'PoleFigure','dubna','Q(11-22)_amp.cnv')};

% crystal-plane normals, one cell per measured file
h = {Miller(1,0,-1,0,CS),...
  [Miller(0,1,-1,1,CS),Miller(1,0,-1,1,CS)],...
  Miller(1,1,-2,2,CS)};

% relative structure coefficients, in the same order as h
c = {1,[0.52,1.23],1};
The second diffraction peak contains the unresolved \((01\bar{1}1)\) and \((10\bar{1}1)\) reflections. Its measured intensity is therefore a weighted superposition of two pole figures, not a fourth measurement. Passing c at import makes that same weighted sum part of the forward model used during reconstruction. See Import for how the structure coefficients are found.
pf = PoleFigure.load(fname,h,CS,'interface','dubna','superposition',c)pf = PoleFigure (y↑→x)
crystal symmetry : -3m1, X||a*, Y||b, Z||c
h = (101̅0), r = 72 × 19 points
h = (011̅1)(101̅1), r = 72 × 19 points
h = (112̅2), r = 72 × 19 pointsThe summary reports three entries on identical \(72 \times 19\) direction grids. The double Miller label on the second entry confirms that its two reflections have not been mistaken for separate measurements.
plot(pf)
mtexColorbar('title','intensity')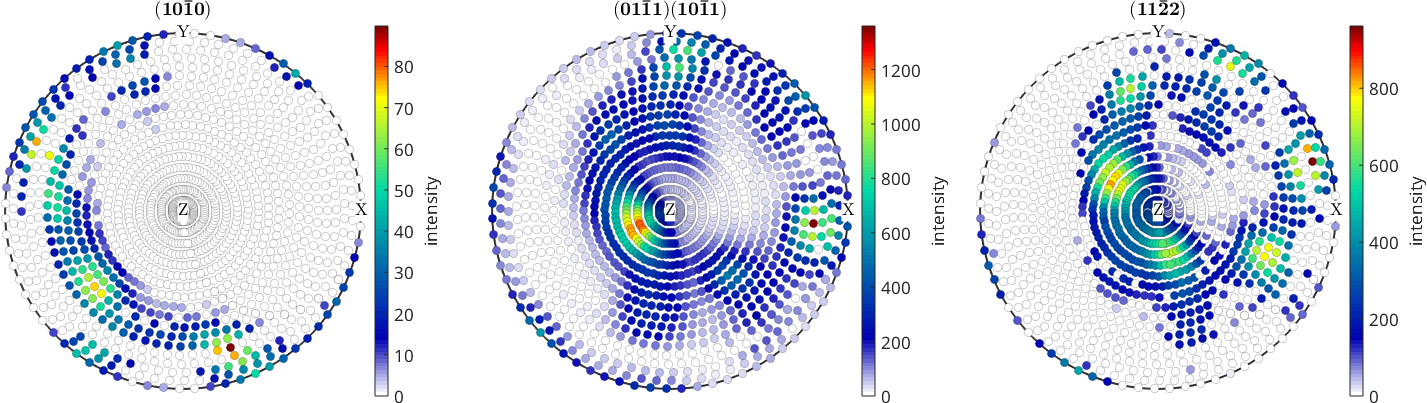
The three panels contain sharp maxima in different specimen directions. The second panel has a much larger raw intensity range, which is why the solver estimates one scale factor per pole figure. These counts are not yet pole densities in multiples of a random distribution (mrd); see ODF Theory.
Inspect the stored data
The object exposes the measured intensities, crystal-plane normals, and specimen directions as ordinary arrays. Different pole figures can use different direction grids, so PoleFigure also provides the cell-valued properties allI, allH, and allR.
I = pf.intensities;
latticeDirections = pf.h;
specimenDirections = pf.r;
Minimum and maximum intensities give a first scale check. The rows follow the three entries in the object summary above.
poleFigureLabel = {'(10-10)';'(01-11)+(10-11)';'(11-22)'};
intensitySummary = table(min(pf).',max(pf).',...
  'VariableNames',{'minimum','maximum'},'RowNames',poleFigureLabel)
intensitySummary =
3×2 table
minimum maximum
_______ _______
(10-10) 0 89.8
(01-11)+(10-11) 0 1360
(11-22) 0 962 isOutlier compares every measurement with its neighbourhood. Use it to create a mask for inspection:
outlierMask = isOutlier(pf);A flag is a prompt to inspect the experiment, not permission to delete a value automatically. Background, defocusing, normalization, and an executable outlier example are in Data Correction.
Select a diagnostic band
High-tilt measurements are especially vulnerable to defocusing. The next condition demonstrates indexed selection by removing only the two rings from 70 through 75 degrees. It deliberately retains directions above 75 degrees, so it is not a recommended high-tilt correction.
keep = pf.r.theta < 70*degree | pf.r.theta > 75*degree;
pf_bandRemoved = pf(keep)

plot(pf_bandRemoved)
mtexColorbar('title','intensity')
pf_bandRemoved = PoleFigure (y↑→x)
crystal symmetry : -3m1, X||a*, Y||b, Z||c
h = (101̅0), r = 1 × 1224 points
h = (011̅1)(101̅1), r = 1 × 1224 points
h = (112̅2), r = 1 × 1224 points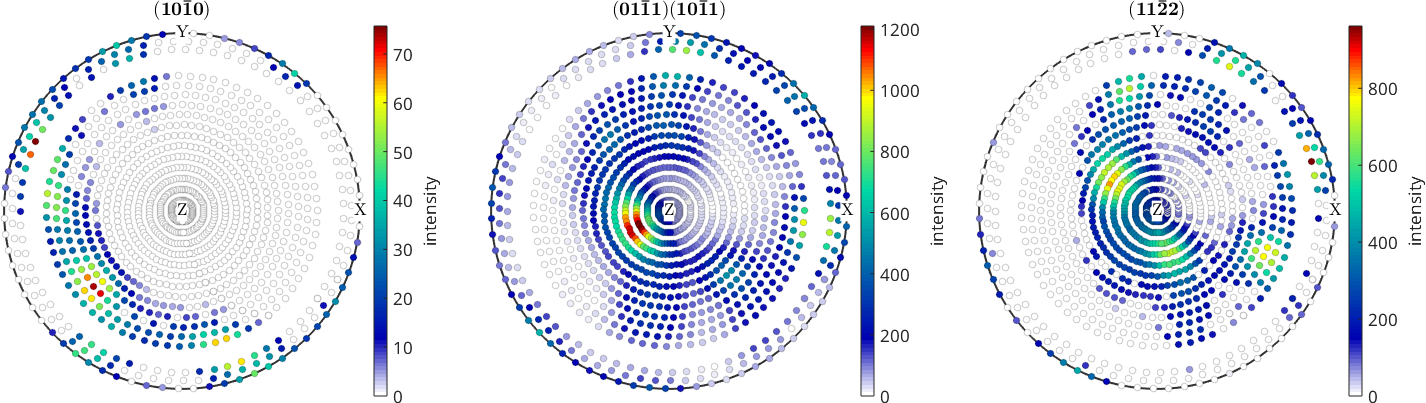
The blank band is the direct visual consequence of the selection. Each entry now contains 1224 of its original 1368 specimen directions.
Rotate the measured directions
rotate actively moves every measured specimen direction while leaving its intensity unchanged. This is not a frame change and not a plotting convention. If import assigned the wrong specimen reference frame, correct the import whenever possible.
rot = rotation.byAxisAngle(xvector-yvector,25*degree);
pf_rotated = rotate(pf,rot);

plot(pf_rotated)
mtexColorbar('title','intensity')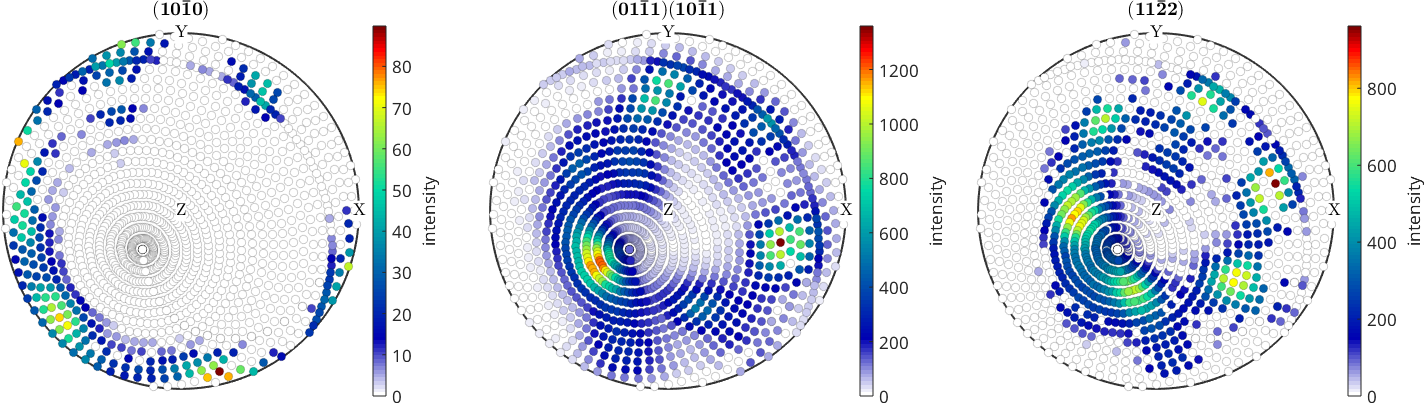
All three intensity patterns turn together relative to the plotted axes. Their values and the number of sampled directions do not change.
Make a coarse reconstruction
A 10 degree orientation grid and at most six solver iterations provide a quick consistency check.
recCoarse = calcODF(pf,'resolution',10*degree,'iterMax',6)recCoarse = SO3FunRBF (3̅m1 → y↑→x)
multimodal components
kernel: de la Vallee Poussin, halfwidth 10°
center: 2472 orientations, resolution: 10°
weight: 1The first check is always the recalculated pole figures against the measured ones above. Recalculate exactly the three measured entities. The 'superposition' option combines the two unresolved reflections with their imported structure coefficients instead of drawing them as separate pole figures.
plotPDF(recCoarse,pf.allH,'antipodal','silent',...
  'superposition',pf.c)
mtexColorbar('title','mrd')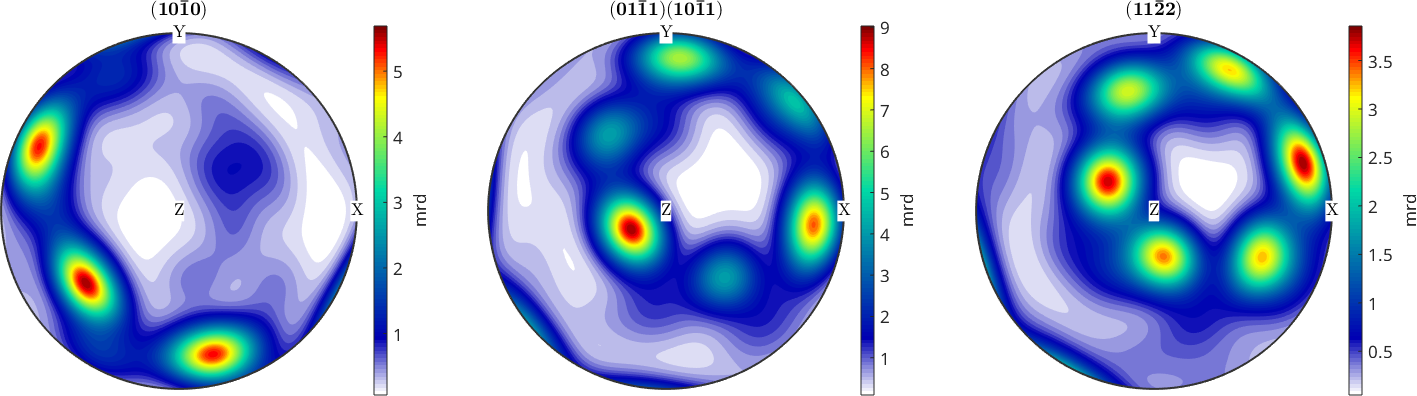
The broad maxima occupy the same regions as in the measured panels and have the same relative order. At this coarse resolution that agreement is only a screening result, not evidence that the recovered ODF is unique. ODF Reconstruction explains the cost of resolution and iteration count. Iterative ODF Reconstruction shows what successively narrowing the kernel can gain.
Reconstruct at the default resolution
The final reconstruction uses the default orientation grid and kernel. Its iteration trace is suppressed because ODF Reconstruction explains that output in detail.
rec = calcODF(pf,'silent'); calcError returns one regularised relative residual per measured pole figure. Label the values so the superposed measurement remains identifiable.
regularisedRelativeResidual = calcError(pf,rec,'silent').';
fitSummary = table(regularisedRelativeResidual,...
  'RowNames',poleFigureLabel)
fitSummary =
3×1 table
regularisedRelativeResidual
___________________________
(10-10) 0.42687
(01-11)+(10-11) 0.18203
(11-22) 0.35339The superposed measurement in the middle fits best, at 0.18, and the \((10\bar{1}0)\) measurement fits worst, at 0.43. A smaller residual means a better match to the measured projection. It does not prove that the ODF itself is unique or true.
Locate the remaining mismatch
plotDiff shows the same regularised relative residual at every measured direction.
plotDiff(pf,rec,'silent')
mtexColorbar('title','relative residual')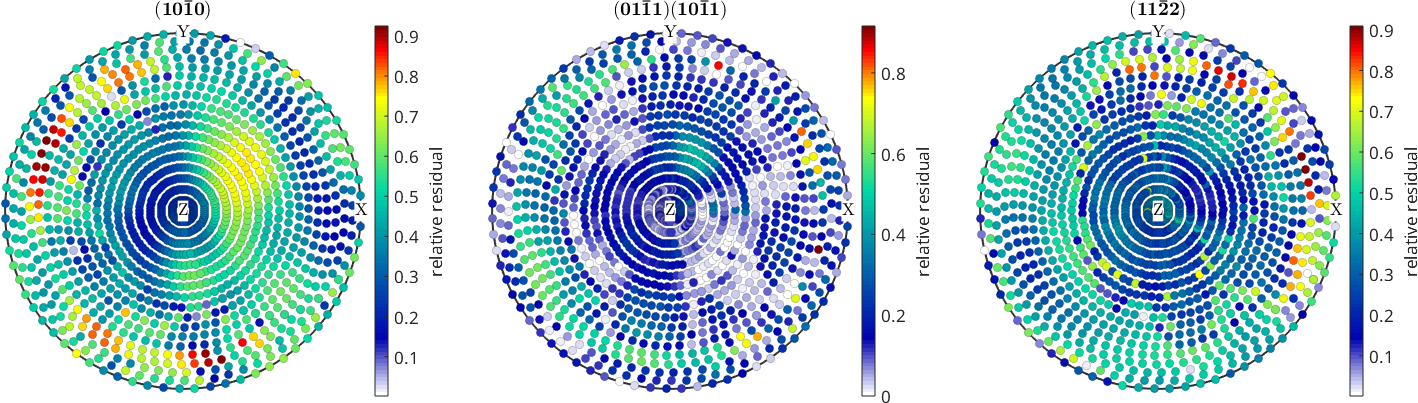
The mismatch is scattered rather than concentrated in one patch, which is consistent with measurement noise. It also grows towards the rim, where the high specimen tilt makes defocusing correction least reliable. Both patterns are diagnostic clues, not proof of a single cause.
Exercises
Working through these on the same data set covers the rest of the chapter:
- inspect the raw pole figures and identify measurements you would not trust;
- remove only values for which you have a physical reason, reconstruct the ODF, and compare the
calcErrorvalues; - reconstruct from fewer pole figures and find the smallest set that still gives a recognisable texture; and
- compare reconstructions with and without ghost correction. Which fits the pole figures better, and why does that comparison not identify the true ODF?
Further reading
- R. Hielscher and H. Schaeben, A novel pole figure inversion method: specification of the MTEX algorithm, Journal of Applied Crystallography 41, 1024--1037, 2008. This specifies the estimator and numerical reconstruction used here.
- S. Matthies, H.-R. Wenk and G. W. Vinel, Some basic concepts of texture analysis and comparison of three methods to calculate orientation distributions from pole figures, Journal of Applied Crystallography 21, 285--304, 1988. It motivates using both integral errors and difference pole figures to assess an inversion.
- K. Ullemeyer et al., Neutron time-of-flight texture measurements in Dubna: status and developments, in 11. Symposium Tektonik, Struktur- und Kristallgeologie, 2006. It describes the SKAT instrument and why time-of-flight diffraction records several pole figures from bulk geological samples.
- H.-J. Bunge, Texture Analysis in Materials Science: Mathematical Methods, Butterworths, English ed., 1982. This is the standard textbook treatment of pole figures and ODF reconstruction.
Next
Export shows how to write measured and recalculated pole figures. Continue to ODF Analysis to quantify the assessed ODF and derive texture characteristics from it.
Citing this page.
This page is part of the documentation of
MTEX, a free and open
source MATLAB toolbox for analyzing and modeling crystallographic textures.
It was written by The MTEX Developers and is published at
https://mtex-toolbox.github.io/PoleFigureDubna.html.
If you use MTEX, or reuse text or figures from this page, in your research,
please cite
F. Bachmann, R. Hielscher, H. Schaeben: Texture Analysis with MTEX - Free and Open Source Software Toolbox, Solid State Phenomena 160 (2010), 63-68. 10.4028/www.scientific.net/SSP.160.63
BibTeX
@article{bachmann2010mtex,
  author  = {F. Bachmann and R. Hielscher and H. Schaeben},
  title   = {Texture Analysis with MTEX - Free and Open Source Software Toolbox},
  journal = {Solid State Phenomena},
  volume  = {160},
  pages   = {63-68},
  year    = {2010},
  doi     = {10.4028/www.scientific.net/SSP.160.63},
  url     = {https://doi.org/10.4028/www.scientific.net/SSP.160.63}
}
Other papers describing specific MTEX methods are listed under Publications — please cite the one that best fits your application. The MTEX source code is licensed under the GNU General Public License v2.0; the text and figures of this documentation are licensed under CC BY 4.0, which permits reuse — including by automated systems — provided The MTEX Developers and this page are credited.