
Sigma sections are two-dimensional slices through orientation space. They separate the specimen direction of a chosen crystal axis from the remaining rotation about that axis. This makes them especially useful for trigonal, tetragonal, and hexagonal textures with one distinguished axis.
This page assumes the distinction between sections and projections from Visualizing ODFs. The classical alternative is introduced in Euler Angle Sections, and crystal directions are introduced in Crystal Directions.
A plotting convention states how the specimen reference frame appears on screen. The convention below draws specimen Y upward and specimen X to the right. It does not rotate the ODF or change its reference frame.
plottingConvention.default('y↑→x');A Texture That Is Hard to Read in Euler Sections
The model ODF contains several localized components. Its definition is kept at the bottom of the script so that the first plot can be read as an unknown texture. The plot uses classical sections of constant third Bunge angle \(\varphi_2\).
cs = crystalSymmetry.load('Ti-Titanium-alpha.cif');
odf = secretODF(cs);

plotSection(odf);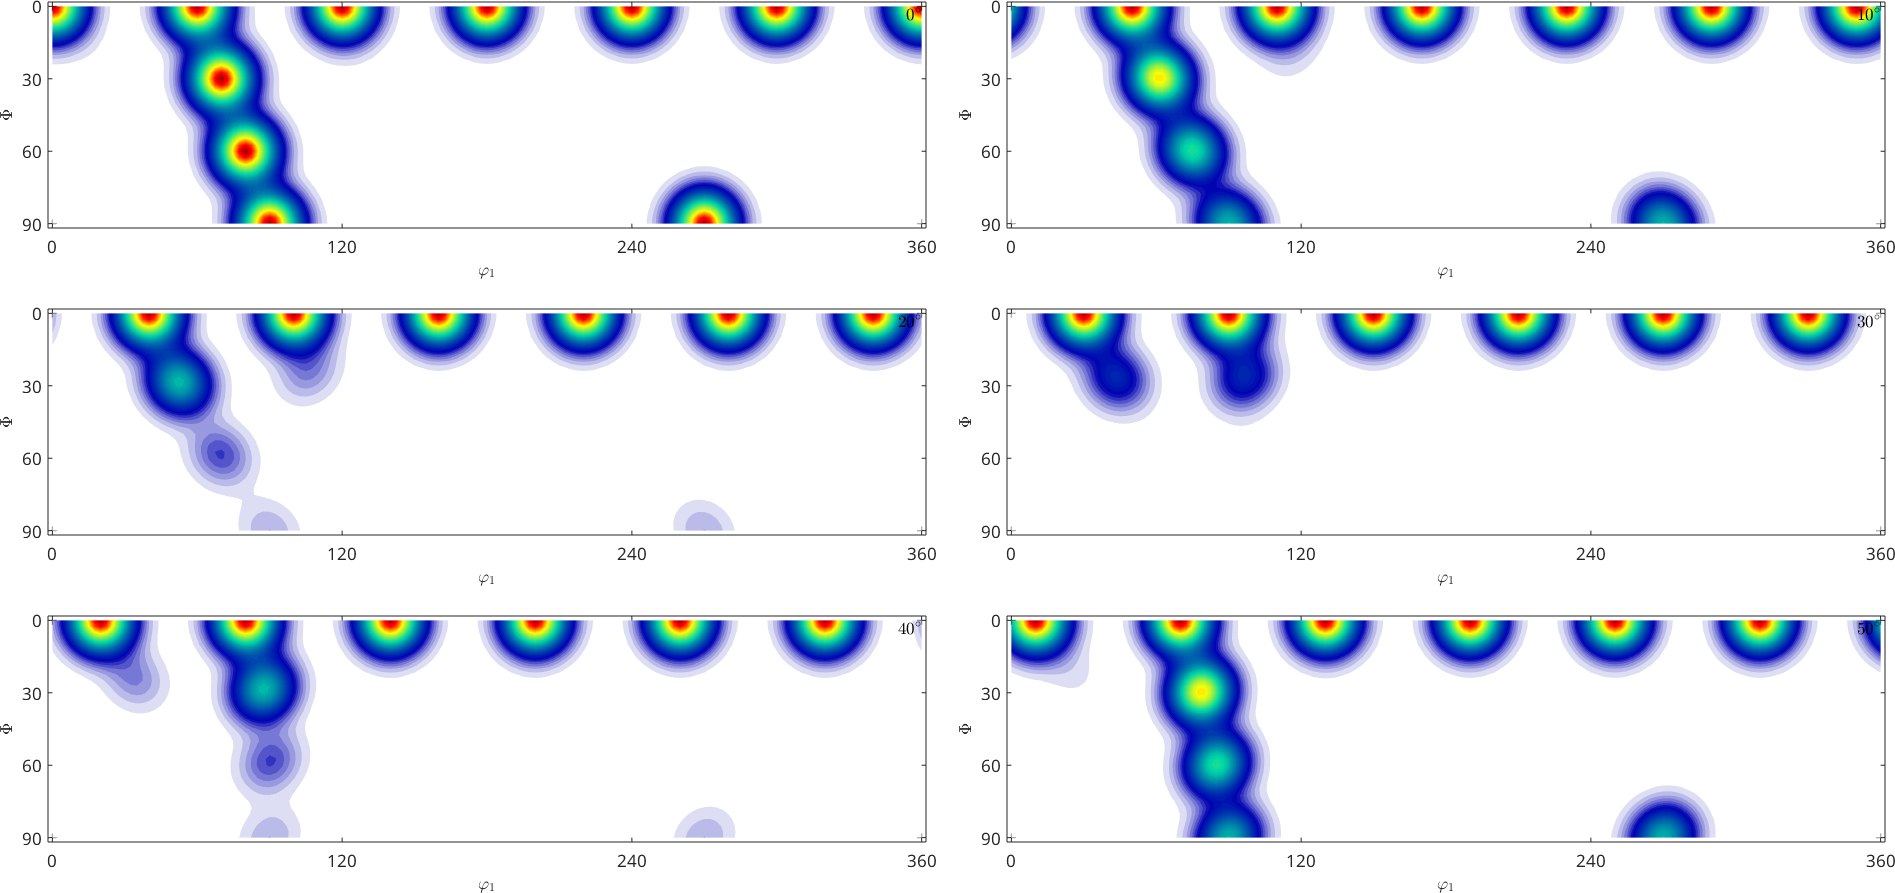
Try to answer three questions from the Euler sections.
- How many components make up the ODF?
- What would its c-axis pole figure look like?
- What would its a-axis pole figure look like?
The components are spread across the Euler panels, so their number and pole-figure paths are difficult to recognize. Sigma sections reorganize the same orientation coordinates around the distinguished axis.
The Coordinates of a Sigma Section
Let an orientation \(g\) have Bunge Euler angles \((\varphi_1,\Phi,\varphi_2)\). For this hexagonal crystal, the polar coordinates \((\Phi,\varphi_1)\) locate \(g\vec c^*\) in the specimen pole figure. The third Euler angle controls the remaining rotation about this transformed axis.
sigmaSections uses \(\vec h_1=\vec c^*\) for the pole position and \(\vec h_2=\vec a\) for the remaining rotation. Direct \(\vec c\) and reciprocal \(\vec c^*\) are parallel in this example. The distinction matters for a general lattice.
At each pole position \(\vec r=g\vec h_1\), MTEX supplies a tangent reference direction \(\mathbf{v}_{\mathrm{ref}}(\vec r)\). The section angle is the signed angle about \(\vec r\) from that reference direction to \(g\vec h_2\),
\[ \sigma = \angle_{\vec r}\left(\mathbf{v}_{\mathrm{ref}}(\vec r), g\vec h_2\right). \]
Hexagonal symmetry makes rotations separated by \(60^{\circ}\) equivalent for the default axes. MTEX therefore uses six sections spanning one \(60^{\circ}\) period. First inspect the section at \(\sigma=0^{\circ}\).
oS = sigmaSections(odf.CS,odf.SS,'sigma',0);

close all;
plot(oS);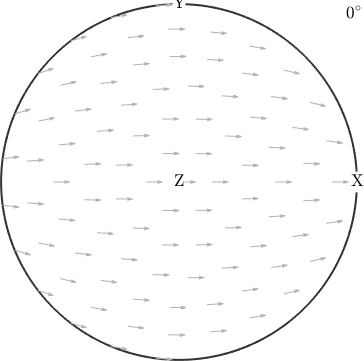
Each position in the disc gives the specimen direction of \(\vec c^*\). The small background arrow gives the local reference direction for \(\vec a\). Together, the position and arrow specify an orientation.
orientation.map constructs two orientations with known axis alignments. The first maps \(\vec c\) to specimen Z and \(\vec a\) to specimen X.
ori1 = orientation.map(cs.cAxis,vector3d.Z,cs.aAxis,vector3d.X);The second maps \(\vec c\) to specimen X and \(\vec a\) to specimen negative Z.
ori2 = orientation.map(cs.cAxis,vector3d.X,cs.aAxis,-vector3d.Z);

hold on;
quiver(ori1.symmetrise,ori1.symmetrise*cs.aAxis,...
  'color','red','linewidth',2);
quiver(ori2.symmetrise,ori2.symmetrise*cs.aAxis,...
  'color','green','linewidth',2);
hold off;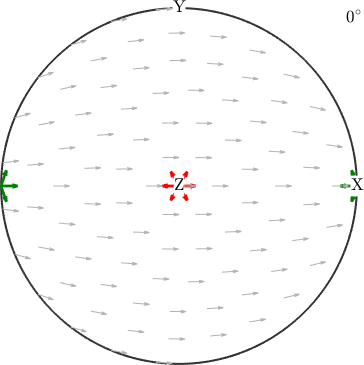
The first orientation lies at the centre because its c-axis points along Z. The second lies at specimen X and at specimen -X. symmetrise draws all six symmetry-equivalent a-axes at each position, so every marker is a six-pointed star; one ray of each star follows the small background arrow.
Following Orientations Through All Sections
Orientations whose a-axes make other angles with the reference field belong in other panels, each drawn with the background arrows rotated. Construct the default six-section geometry and add three orientations with their transformed a-axes.
oS = sigmaSections(odf.CS,odf.SS);
close all;
plot(oS,'figSize','large');

ori1 = orientation.byEuler(60*degree,40*degree,60*degree,cs);
ori2 = orientation.byEuler(200*degree,80*degree,110*degree,cs);
ori3 = orientation.byEuler(40*degree,0*degree,0*degree,cs);

hold on;
quiver(ori1.symmetrise,ori1.symmetrise*cs.aAxis,...
  'color','red','linewidth',2);
quiver(ori2.symmetrise,ori2.symmetrise*cs.aAxis,...
  'color','green','linewidth',2);
quiver(ori3.symmetrise,ori3.symmetrise*cs.aAxis,...
  'color','blue','linewidth',2);
hold off;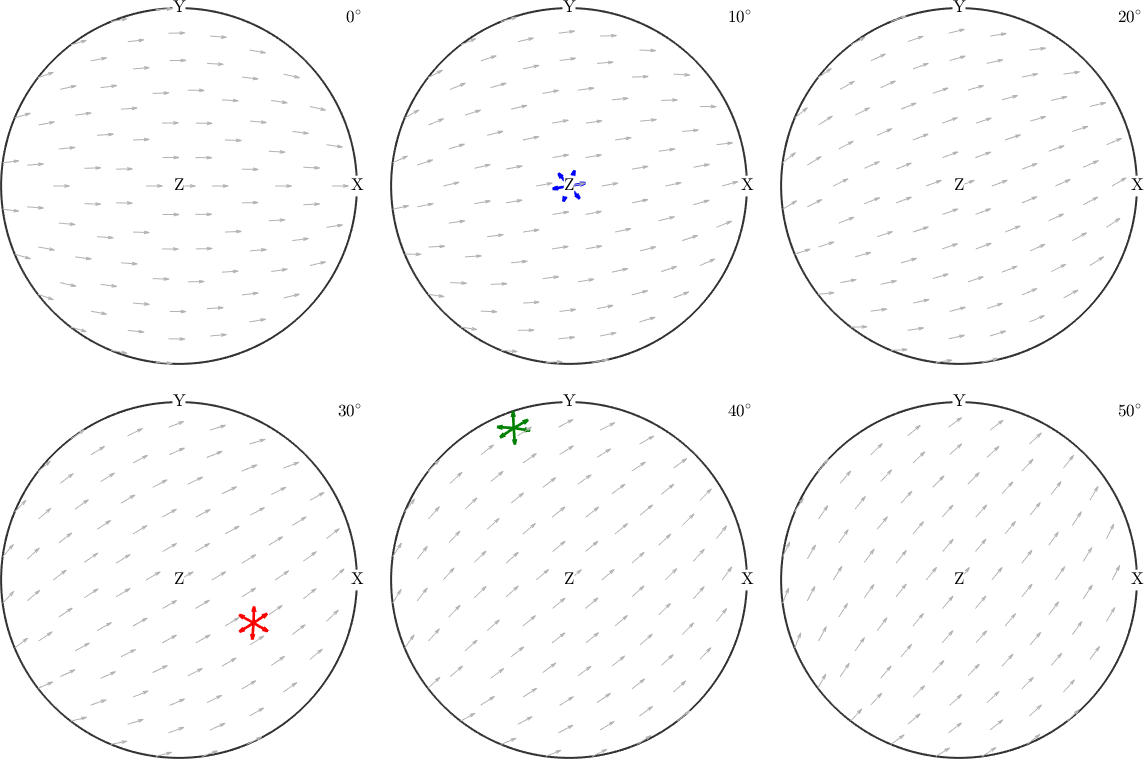
Each coloured star of a-axes appears only in the panel that contains its orientation: blue at \(\sigma=10^{\circ}\), red at \(30^{\circ}\) and green at \(40^{\circ}\). The same orientations can be drawn as crystal shapes instead of arrows.
cS = crystalShape.hex(cs);
ori = [ori1,ori2,ori3];
close all;
plotSection(ori,0.5.*(ori*cS),oS,'figSize','large');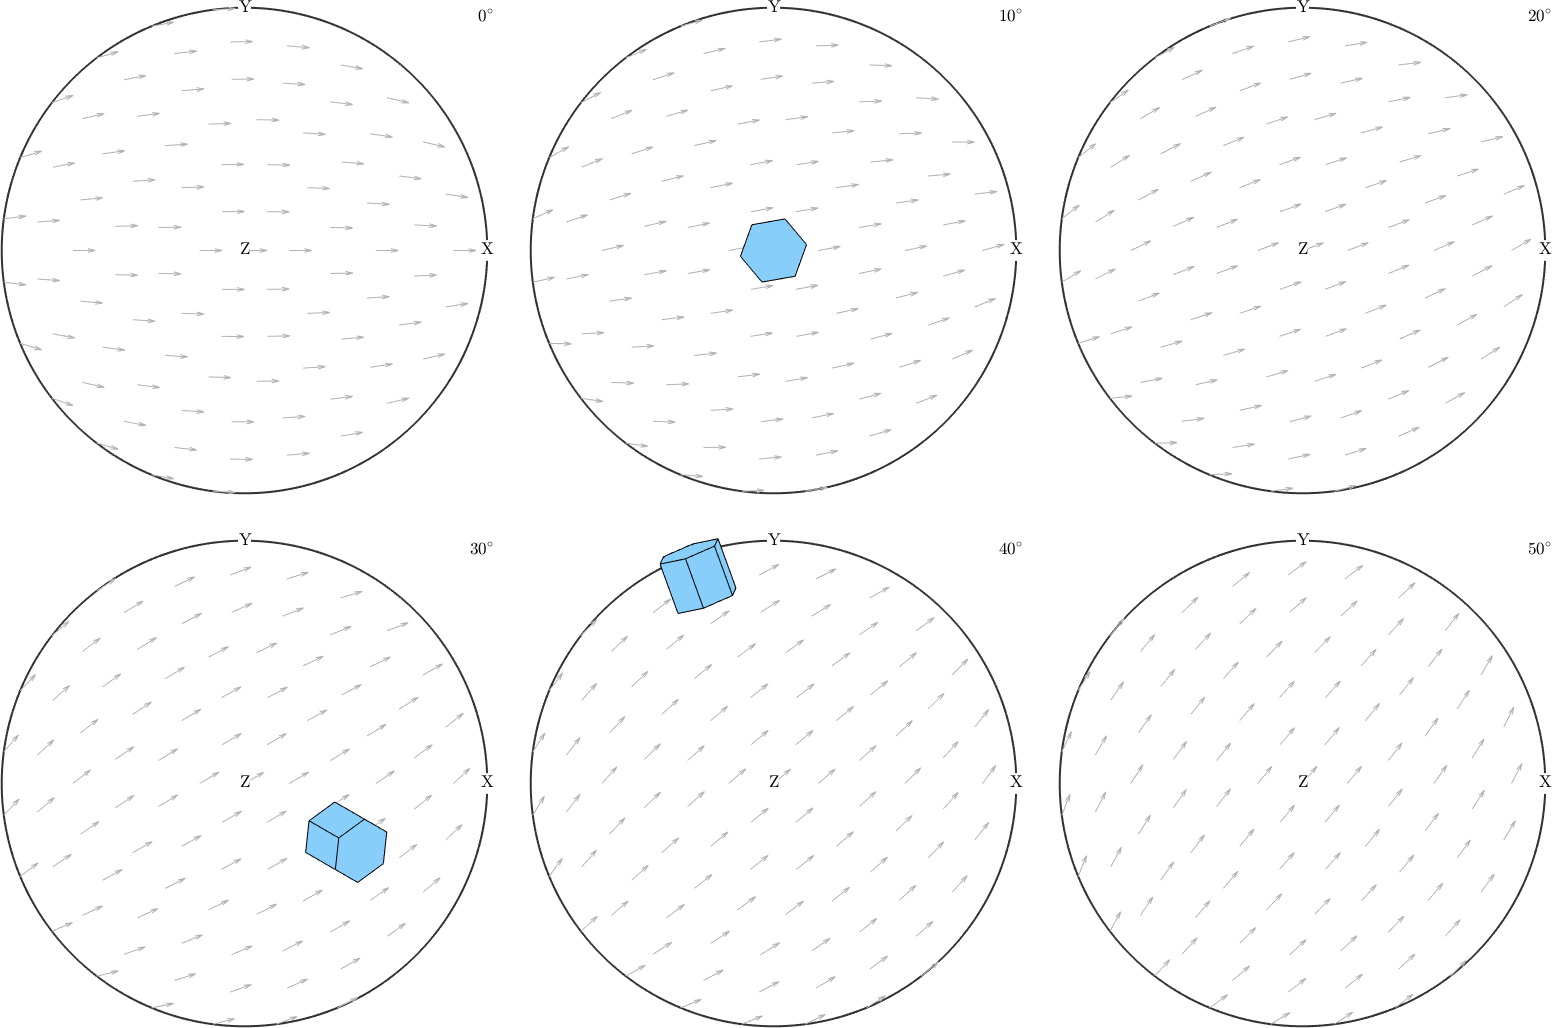
The crystal shapes make both parts of the coordinate visible. The crystal at the centre of the \(\sigma=10^{\circ}\) panel is seen down its c-axis and appears as a regular hexagon; the other two tilt with their c-axis, and their basal edges follow the rotation assigned to their panel.
Reading the Model ODF
Plot the model from the first section with the same sigma geometry.
close all;
plotSection(odf,oS,'figSize','large');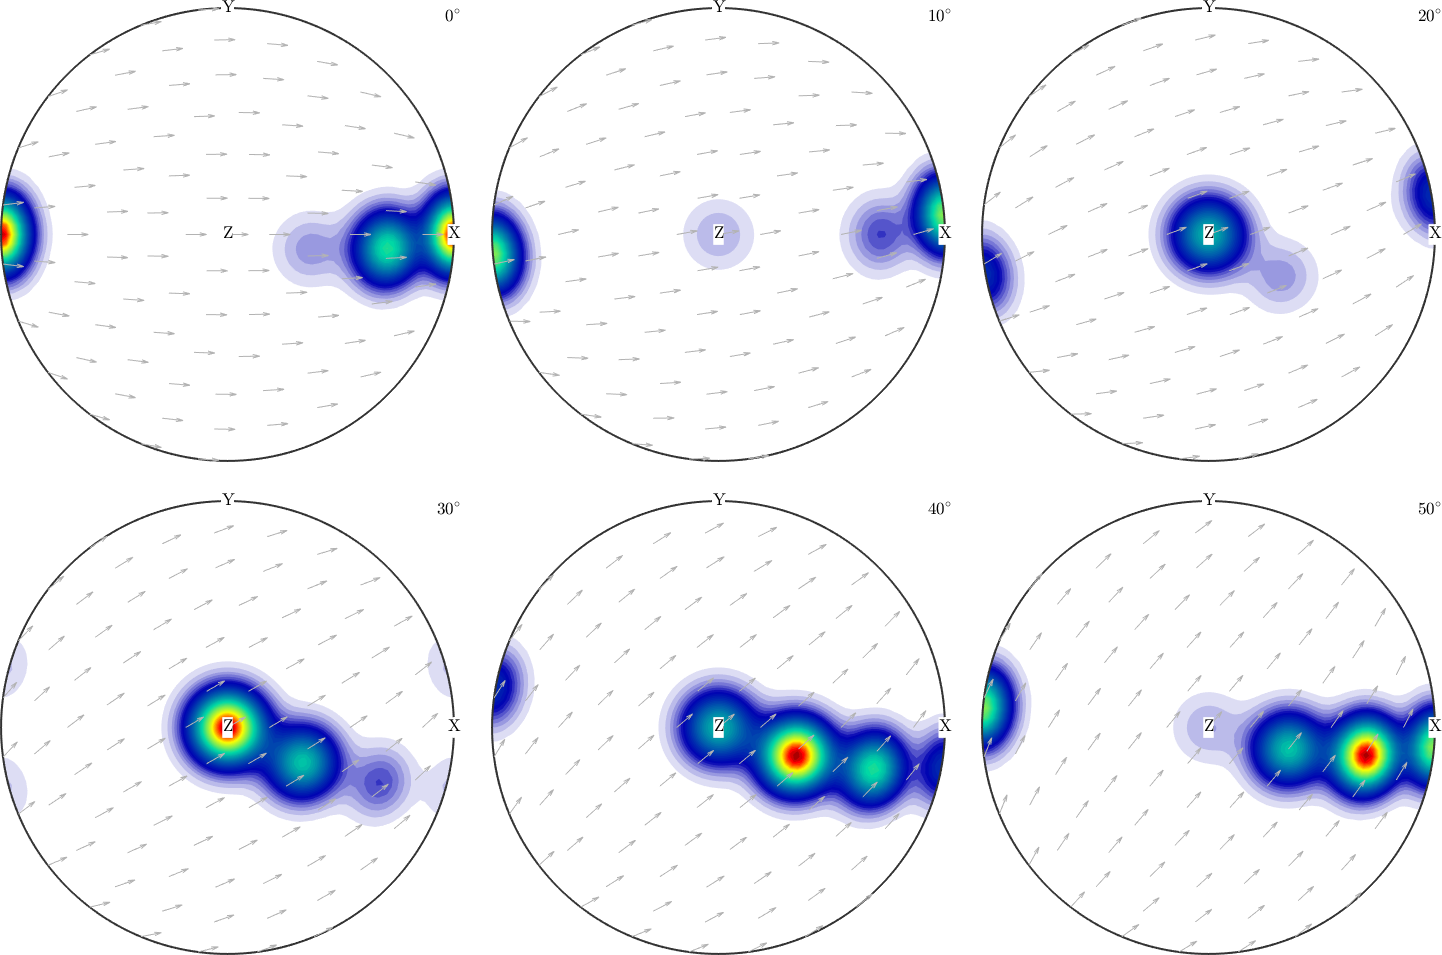
Four compact maxima are now distinct, one to a panel. The maximum in the \(\sigma=30^{\circ}\) panel sits at the centre: its c-axis is parallel to specimen Z and its a-axis parallel to specimen Y. In the panels at \(40^{\circ}\), \(50^{\circ}\) and \(0^{\circ}\) the c-axis turns towards X in steps of \(30^{\circ}\) while the a-axis turns towards Z.
This reading predicts a c-axis girdle from Z to X and a complementary a-axis girdle. The two pole figures confirm those paths.
close all;
plotPDF(odf,[cs.cAxis,cs.aAxis]);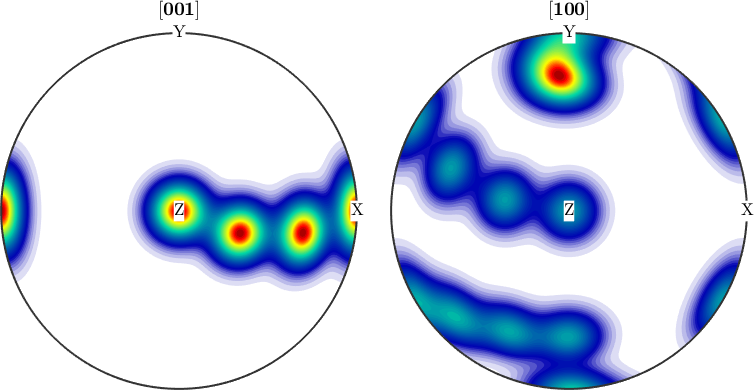
The pole figures show the predicted girdles, but they give only the axis directions and not the rotation about them. A pole figure integrates the ODF along an orientation fibre, whereas a sigma section evaluates the ODF on one slice. A section is therefore not a pole figure with some intensity removed.
Why the Pole Position Alone Is Not Enough
The c-axis pole figure has four maxima of about 11.5 mrd, at \(0^{\circ}\), \(30^{\circ}\), \(60^{\circ}\) and \(90^{\circ}\) from specimen Z. The last one lies on the rim and is drawn at both ends of it.
close all;
plotPDF(odf,Miller(0,0,0,1,cs));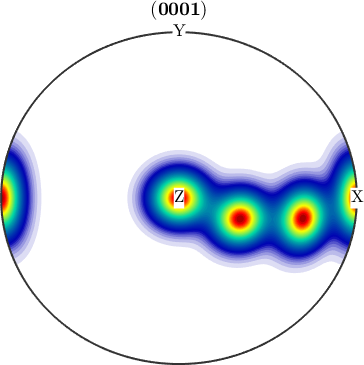
The pole figure stops there. The earlier sigma plot puts each of the four maxima into a different panel, so each of them carries a different rotation about its c-axis.
The rim maximum is one component, not a fibre. Along the rim the ODF density is 32 mrd at \(\sigma=0^{\circ}\), 23 mrd in the two neighbouring panels and 1.4 mrd at \(\sigma=30^{\circ}\); that spread is the \(10^{\circ}\) halfwidth of the model kernel. A fibre would keep the same rim density in every panel, because the rotation about that c-axis would be free. Confirm a fibre by evaluating the ODF along the corresponding orientation fibre as shown in Visualizing ODFs. The pole figure alone cannot make either distinction.
Customizing the Axes and Reference Field
Reusing a sigmaSections object keeps the same geometry across plots. Change h2 to measure the section angle with the \((10\bar10)\) direction instead of the default a-axis.
oS = sigmaSections(odf.CS,odf.SS);
oS.h2 = Miller(1,0,-1,0,cs);

close all;
plotSection(odf,oS,'figSize','large');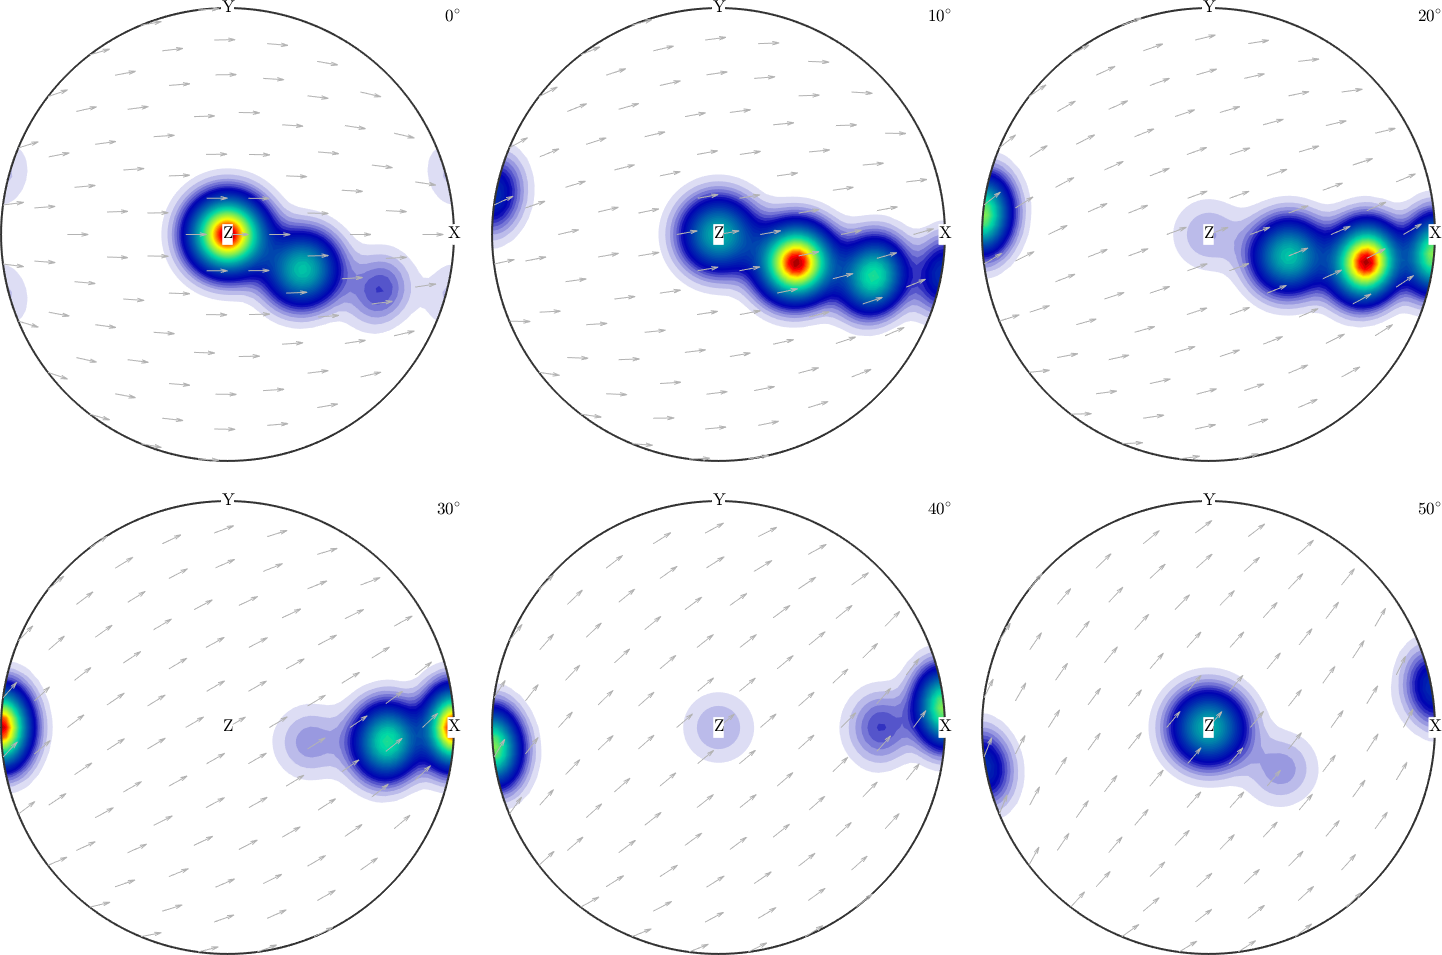
The density represents the same ODF, but its features move between panels because the second direction now defines a different angular coordinate. The reference field itself can also be replaced, for example by
oS.referenceField = S2VectorField.polar(xvector);
The new field changes the zero of the section angle across the disc. It does not rotate the ODF.
Splitting a Different Pole Figure
The property h1 chooses which crystal-direction pole figure supplies the positions in the panels. The second direction h2 must be orthogonal to h1 so that it can measure rotation about the pole direction.
oS.h1 = Miller(1,0,-1,1,'hkil',odf.CS);
oS.h2 = Miller(-1,2,-1,0,odf.CS,'UVTW');
The new h1 is not a crystal symmetry axis. Its rotation has no reduced \(60^{\circ}\) period, so the sections must cover the full \(360^{\circ}\). Twelve panels keep that full range readable.
oS.omega = (0:30:330)*degree;

close all;
plot(odf,oS,'figSize','large');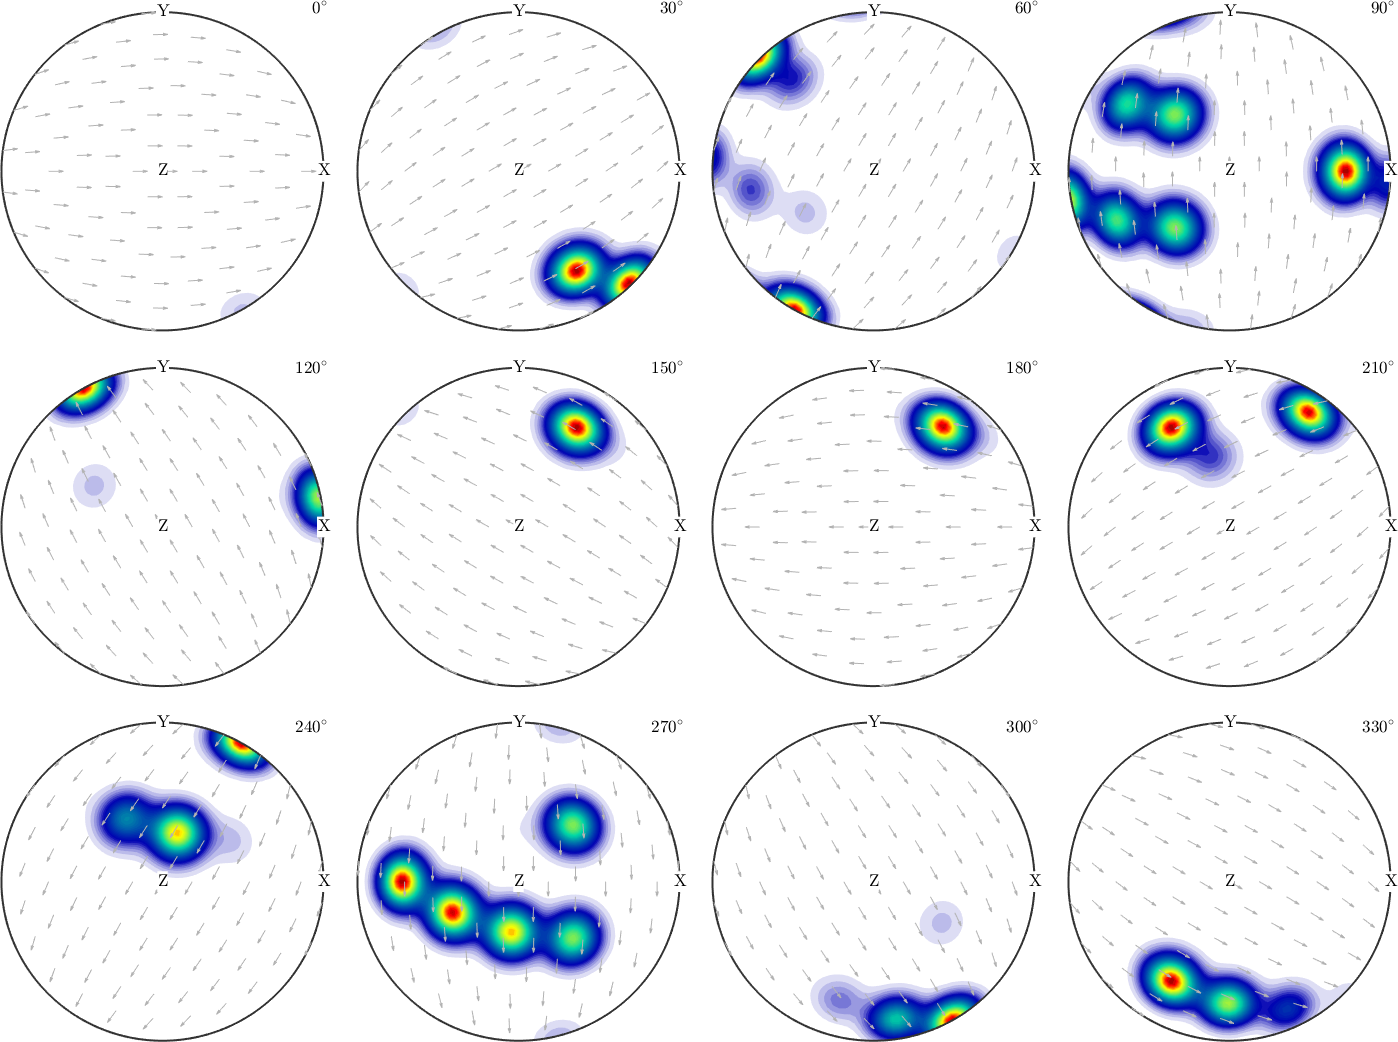
The final gallery now places \(g\vec h_1\), rather than \(g\vec c^*\), in each panel. The background arrows show the chosen zero direction for \(g\vec h_2\), and the panel labels give its rotation about \(g\vec h_1\).
Further Reading
- S. Matthies, K. Helming, and K. Kunze, On the Representation of Orientation Distributions in Texture Analysis by Sigma-Sections. I, physica status solidi (b) 157 (1990), 71--83, develops the general geometry and interpretation of sigma sections.
- S. Matthies, K. Helming, and K. Kunze, On the Representation of Orientation Distributions in Texture Analysis by Sigma-Sections. II, physica status solidi (b) 157 (1990), 489--507, treats crystal and specimen symmetry and gives worked examples.
- H.-J. Bunge, Texture Analysis in Materials Science: Mathematical Methods, Butterworths, English ed., 1982, develops ODFs, pole figures, and classical Euler sections.
- D. Chateigner, L. Lutterotti, and M. Morales, Quantitative Texture Analysis and Combined Analysis, International Tables for Crystallography H, ch. 5.3, 2019, relates Euler coordinates, ODFs, and pole-figure projections in a common reference-frame description.
Next
Compare the other section families and their shared options in Euler Angle Sections. Continue with Pole Figures to study the projection that a sigma section uses as its positional coordinate. Then use Component Analysis to quantify the maxima found in a section plot.
function odf = secretODF(cs)

ori = [orientation.byEuler(60*degree,0*degree,0*degree,cs),...
  orientation.byEuler(70*degree,30*degree,0*degree,cs),...
  orientation.byEuler(80*degree,60*degree,0*degree,cs),...
  orientation.byEuler(90*degree,90*degree,0*degree,cs)];

odf = unimodalODF(ori);

end
Citing this page.
This page is part of the documentation of
MTEX, a free and open
source MATLAB toolbox for analyzing and modeling crystallographic textures.
It was written by The MTEX Developers and is published at
https://mtex-toolbox.github.io/SigmaSections.html.
If you use MTEX, or reuse text or figures from this page, in your research,
please cite
F. Bachmann, R. Hielscher, H. Schaeben: Texture Analysis with MTEX - Free and Open Source Software Toolbox, Solid State Phenomena 160 (2010), 63-68. 10.4028/www.scientific.net/SSP.160.63
BibTeX
@article{bachmann2010mtex,
  author  = {F. Bachmann and R. Hielscher and H. Schaeben},
  title   = {Texture Analysis with MTEX - Free and Open Source Software Toolbox},
  journal = {Solid State Phenomena},
  volume  = {160},
  pages   = {63-68},
  year    = {2010},
  doi     = {10.4028/www.scientific.net/SSP.160.63},
  url     = {https://doi.org/10.4028/www.scientific.net/SSP.160.63}
}
Other papers describing specific MTEX methods are listed under Publications — please cite the one that best fits your application. The MTEX source code is licensed under the GNU General Public License v2.0; the text and figures of this documentation are licensed under CC BY 4.0, which permits reuse — including by automated systems — provided The MTEX Developers and this page are credited.